This is not about databases completely maintained in cloud, this is about databases created and maintain on-premises but data and log files are maintained in Microsoft Cloud: Azure.
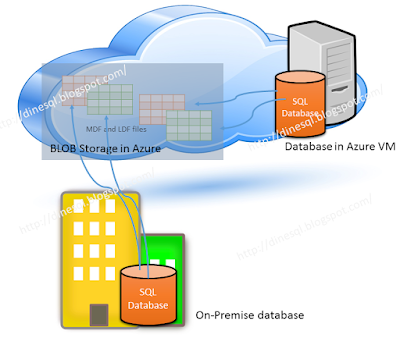
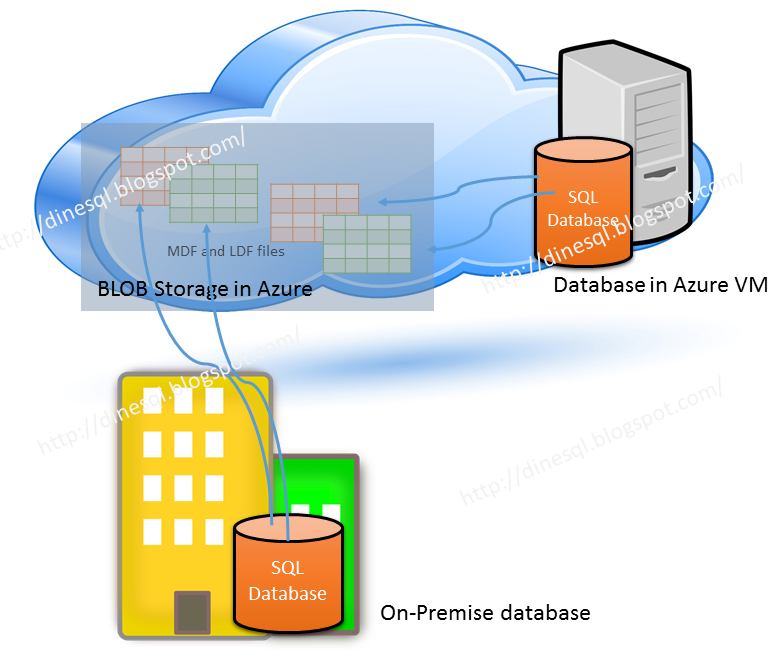
Microsoft Windows Azure allows us to store database files store in Azure storage while maintaining the database in an on-premise SQL Server instance. This offers many benefits, not only performance and maintenance wise, cost-wise as well. This facility was introduced with SQL Server 2014 and it has been enhanced with SQL Server 2016. Except some restrictions, we can simply work with the database as if it is fully maintained in the server though files are in Azure storage.
What sort of benefits we get from this?
Main thing is, support on disaster recovery. If something happen to the server or VM hosted in Azure, we do not need to worry because there will be no harm to data files, and we can set up a new database in a new server connecting to files in Azure storage. Another is, more security with TDE. We can enable TDE for the database while keeping all keys in local master database. This allows us to encrypt data in data files and do not need to worry even someone has stolen credentials related to the storage.
In addition to that, it gives some benefits on the cost as we do not need to maintain infrastructure specifically on storage. Not only that, a new feature called Snapshot backup is available with this, which allows us to take instantaneous backups or restore based on files.
How to set up the environment?
Main requirement for this is, an Azure Storage Account. You need a classic storage for this. Once the storage is created, then you need to create a Policy on the Storage Container and Shared Access Signature (SAS) key. After that, you need to create a Credential using SAS in local instance. Then only you can create the database, placing files in the Azure Storage. Let's do all step by step.
Creating Policy and Shared Access Signature in Azure Storage
This has to be done with PowerShell. For that we need Azure PowerShell that provides cmdlets for managing Azure. Open Windows PowerShell ISE and type following. It will install Azure Resource Manager modules.
Install-Module AzureRM
You will be promoted with various windows based on components you have already installed.


And finally you should see a screen like this;

Next we need to install Azure Service Management module. For that, type the following and continue just like previous step.

Let's login to Azure account manager for continuing.
Install-Module Azure

Let's login to Azure account manager for continuing.
You should get the login dialog box. Provide userid and password to continue.


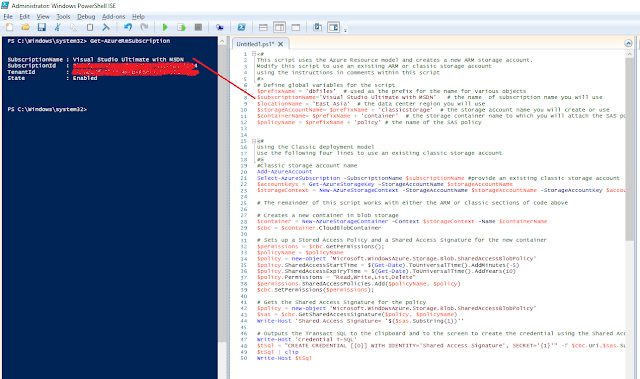
Type the following cmdlet for getting Azure Subscription information and then open a window for Scripting.
And place the following code into the Script Window. I have taken this code from Lesson 1: Create a stored access policy and a shared access signature on an Azure container and modified as I want. If you need the entire code, please refer the link. Note that I have already created a Classic Storage called dbfilesclassicstorage and a Container called dbfilescontainer. This script uses the storage and container if exist, else it creates them.
This script outputs the CREATE CREDENTIAL TQL statement we need. Get it copied and use it for creating the Credential in local SQL Server instance.

Creating Credentials in SQL Server
We have done all required from Azure end. Now we need to create a Credential for accessing the storage using the key created. Open the Management Studio and place the copied code from PowerShell, and run it.

Let's create the database now
Now we can create the database. Make sure you use the Azure storage path for placing the files.

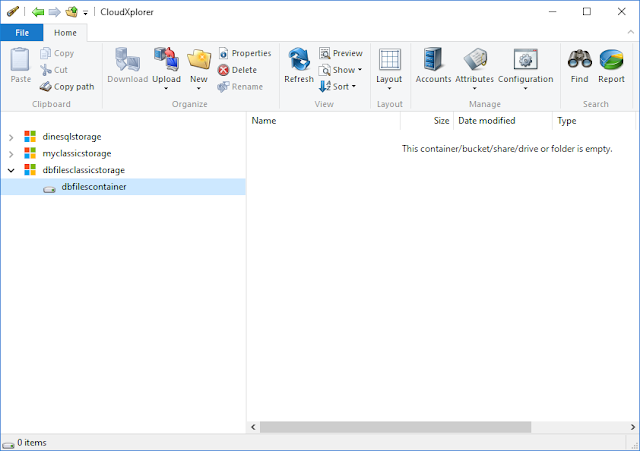
Once the database is created, you should see files in your storage like below;

Everything is done. Now the database is maintained locally and files are managed by Azure. For testing purposes, let's create a table and see;

Read more on this with following links;
SQL Server Data Files in Microsoft Azure
How to install and configure Azure PowerShell


Type the following cmdlet for getting Azure Subscription information and then open a window for Scripting.
Get-AzureRmSubscription
And place the following code into the Script Window. I have taken this code from Lesson 1: Create a stored access policy and a shared access signature on an Azure container and modified as I want. If you need the entire code, please refer the link. Note that I have already created a Classic Storage called dbfilesclassicstorage and a Container called dbfilescontainer. This script uses the storage and container if exist, else it creates them.
<#
This script uses the Azure Resource model and creates a new ARM storage account.
Modify this script to use an existing ARM or classic storage account
using the instructions in comments within this script
#>
# Define global variables for the script
$prefixName = 'dbfiles'  # used as the prefix for the name for various objects
$subscriptionName='Visual Studio Ultimate with MSDN'   # the name  of subscription name you will use
$locationName = 'East Asia'  # the data center region you will use
$storageAccountName= $prefixName + 'classicstorage'  # the storage account name you will create or use
$containerName= $prefixName + 'container'  # the storage container name to which you will attach the SAS policy with its SAS token
$policyName = $prefixName + 'policy' # the name of the SAS policy


<#
Using the Classic deployment model
Use the following four lines to use an existing classic storage account
#>
#Classic storage account name
Add-AzureAccount
Select-AzureSubscription -SubscriptionName $subscriptionName #provide an existing classic storage account
$accountKeys = Get-AzureStorageKey -StorageAccountName $storageAccountName
$storageContext = New-AzureStorageContext -StorageAccountName $storageAccountName -StorageAccountKey $accountKeys.Primary

# The remainder of this script works with either the ARM or classic sections of code above

# Creates a new container in blob storage
$container = New-AzureStorageContainer -Context $storageContext -Name $containerName
$cbc = $container.CloudBlobContainer

# Sets up a Stored Access Policy and a Shared Access Signature for the new container
$permissions = $cbc.GetPermissions();
$policyName = $policyName
$policy = new-object 'Microsoft.WindowsAzure.Storage.Blob.SharedAccessBlobPolicy'
$policy.SharedAccessStartTime = $(Get-Date).ToUniversalTime().AddMinutes(-5)
$policy.SharedAccessExpiryTime = $(Get-Date).ToUniversalTime().AddYears(10)
$policy.Permissions = "Read,Write,List,Delete"
$permissions.SharedAccessPolicies.Add($policyName, $policy)
$cbc.SetPermissions($permissions);

# Gets the Shared Access Signature for the policy
$policy = new-object 'Microsoft.WindowsAzure.Storage.Blob.SharedAccessBlobPolicy'
$sas = $cbc.GetSharedAccessSignature($policy, $policyName)
Write-Host 'Shared Access Signature= '$($sas.Substring(1))''

# Outputs the Transact SQL to the clipboard and to the screen to create the credential using the Shared Access Signature
Write-Host 'Credential T-SQL'
$tSql = "CREATE CREDENTIAL [{0}] WITH IDENTITY='Shared Access Signature', SECRET='{1}'" -f $cbc.Uri,$sas.Substring(1)
$tSql | clip
Write-Host $tSql


This script outputs the CREATE CREDENTIAL TQL statement we need. Get it copied and use it for creating the Credential in local SQL Server instance.

Creating Credentials in SQL Server
We have done all required from Azure end. Now we need to create a Credential for accessing the storage using the key created. Open the Management Studio and place the copied code from PowerShell, and run it.

Let's create the database now
Now we can create the database. Make sure you use the Azure storage path for placing the files.
CREATE DATABASE Sales
ON
( NAME = Sales_Data,
    FILENAME = 'https://dbfilesclassicstorage.blob.core.windows.net/dbfilescontainer/SalesData.mdf' )
 LOG ON
( NAME = Sales_Log,
    FILENAME =  'https://dbfilesclassicstorage.blob.core.windows.net/dbfilescontainer/SalesLog.ldf');

Once the database is created, you should see files in your storage like below;

Everything is done. Now the database is maintained locally and files are managed by Azure. For testing purposes, let's create a table and see;

Read more on this with following links;
SQL Server Data Files in Microsoft Azure
How to install and configure Azure PowerShell
No comments:
Post a Comment